
Contents
Accessing with WebDAV
This document describes how to access GrizzFiles via WebDAV. WebDAV allows access files from a computer through the systems native file explorer.
There are two main steps to accessing GrizzFiles with WebDAV.
- Generate an application password.
- Setup the connection on your computer based on the specific operating system (e.g. Windows 10, Mac OS, Linux) using the generated application password.
Generate Application Password
In order to use WebDAV, you need to create an application password. This will allow applications, such as WebDAV, that do not support DUO Multi-Factor authentication to be able to authenticate and connect.
1. Login to https://grizzfiles.oakland.edu

2. Click the profile icon in the top right corner of the screen, and click on "Settings".

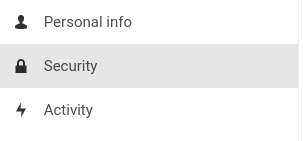
3. Once on the "Settings" page click "Security" on the left sidebar.

4. In the "Devices & sessions" section, add a name in the "App name" text box. You may wish to be descriptive in the "App name" to help distinguish one connection from another such as adding the computer name or if you use a Windows Desktop and an Apple Mac you might use "Windows-WebDAV" or "Mac-WebDAV" as you may wish to revoke specific access at some point.

5. Copy the generated password into a password manager, as it will only be shown this one time.

6. Setup the WebDAV connection based on the instructions below for your specific operating system.
Windows
To map a drive using the Microsoft Windows Explorer:
1. Navigate to "This PC" in Windows Explorer.
2. Right-click on "This PC" and select "Map network drive…" from the drop-down menu.

3. Choose a local network drive to which you want to map Nextcloud.
4. Specify the address to Grizzfiles, https://grizzfiles.oakland.edu/remote.php/dav/files/[Your_NetID]@oakland.edu/
- NOTE: You must replace the section of [Your_NetID] in the above link with your own personal NetID.

5. Click the "Finish" button,

6. Input your NetID and the generated Application Password.
Windows Explorer maps the network drive, making your Nextcloud instance available.
Mac OS X
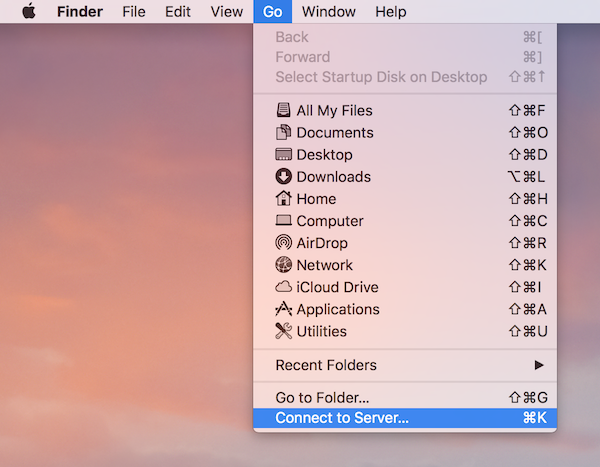
1. From the Finder's top menu bar, choose Go > Connect to Server...:

2. When the Connect to Server… window opens, enter your Nextcloud server’s WebDAV address in the Server Address: field, i.e.:https://grizzfiles.oakland.edu/remote.php/dav/files/[Your_NetID]@oakland.edu/

3. Click Connect. Your WebDAV server should appear on the Desktop as a shared disk drive.
Linux
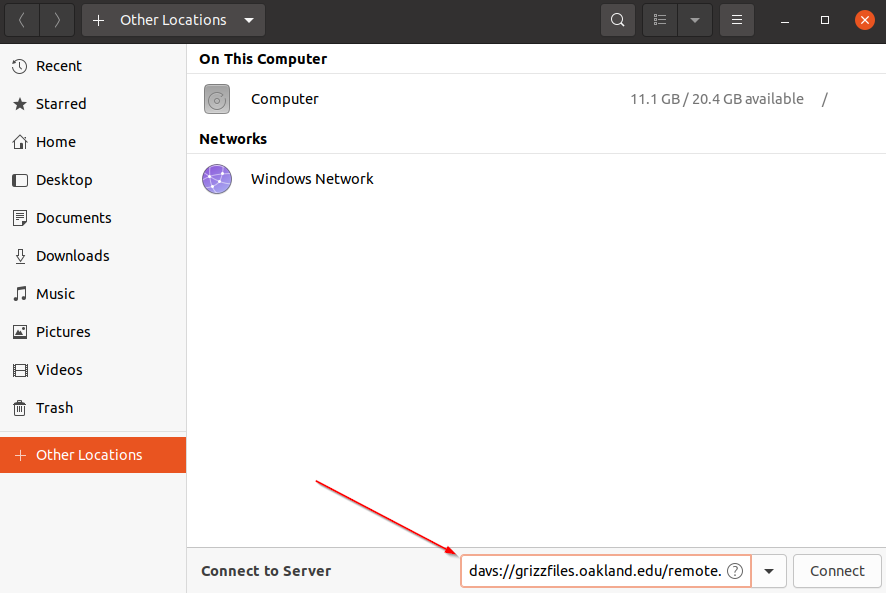
Navigate to Files and click "other locations." Then copy/paste your own WebDAV link into the "connect to a server" box.
Change the beginning of the link from "https" to "davs"

Lastly, input the previously generated password.

General Connection Information
Connection Settings
Name
Server URL
https://grizzfiles.oakland.edu/remote.php/dav/files/[Your_NetID]@oakland.edu/
Username
[Your_NetID]@oakland.edu
Password
[Your generated app password]
Note: You can find the specific Server URL for your WebDAV connection and copy and paste it by clicking on the File Folder ("Files") in the top left and then click the "Settings" in the bottom left corner to display the WebDAV URL.
